
Kingdom Rush Vengeance MOD APK (Unlimited Diamonds, Unlock)

Description
Kingdom Rush Vengeance flips the series around and hands you Vez’nan’s dark army across 42 stages and nine realms. Commanders who keep losing their last lives on wave nine will find the gold timing and loadout order that fixes it here. The single biggest early gain comes from summoning waves early for bonus gold, because that extra income buys your third tower two waves sooner.
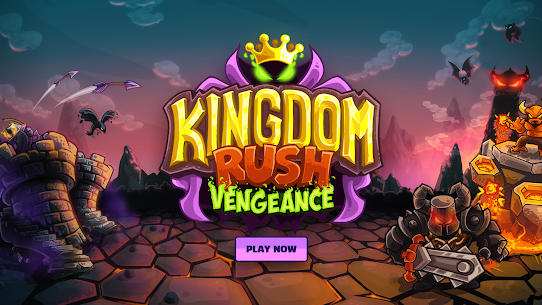
How to Play Kingdom Rush Vengeance as Vez’nan’s Dark Army
Kingdom Rush Vengeance is an offline fantasy tower defense campaign that puts you in the villain role as the dark wizard Vez’nan. You take five towers into every stage and fund them with gold dropped by the enemies your defenses kill.
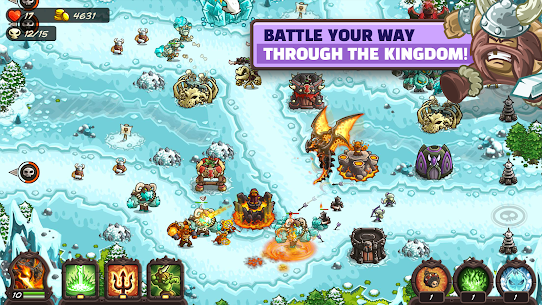
Enemies walk fixed paths toward your exit point. Each escape costs a life, and losing all your lives ends the run. Towers never move once built, so placement matters more than reflexes here.
The dark army roster leans on orcs, goblins, demons and undead rather than royal archers. Heroes fight as a single unit you drag around the battlefield. Bloons TD 6 and Realm Defense: Hero Legends TD sit in the same Android tower defense shelf, though both handle upgrades very differently.
What the Core Loop Looks Like Under Vez’nan
Every stage opens with empty build spots and a small gold purse. You build one or two towers near the first bend, let the opening waves feed you gold bounty, then add towers as income grows. Because towers cannot be moved, a bad first placement follows you for the whole level.
Tower upgrades run in tiers, and the strongest abilities sit at the top of each tower’s path. However, the game only lets you buy a tower ability in battle after you have unlocked it in that tower’s upgrade tree outside battle. First-time commanders often stall right there, wondering why an ability icon looks greyed out during a fight.
The Dark Army Story and the Linirea Setting
Vez’nan returns from his earlier defeat and marches on Linirea to take the crown. Stage briefings carry his commentary, and his opinion of Gerald Lightseeker as a fading hero sets the tone for the whole campaign. The writing stays light, with plenty of jokes hidden in enemy names and stage details.
Nine realms carry that march, from dwarven tunnels like Kazan Mines through frozen ground and pirate coastline. Each realm swaps the enemy mix instead of just changing the wallpaper. For example, dwarven stages push armored units at you, so physical damage alone starts falling behind.
How It Stacks Up Against Bloons TD 6 and Realm Defense
Bloons TD 6 gives you unlimited tower types per map and deep upgrade paths per tower. This campaign does the opposite by capping you at five tower slots, which turns loadout choice into the real puzzle. Realm Defense: Hero Legends TD sits closer in tone, though its heroes carry far more of the damage load.
Session length also splits the three. A stage here runs roughly 8 to 12 minutes, so it fits a commute better than a long Bloons TD 6 round. By contrast, both rivals lean harder on grinding, while this campaign expects you to rebuild your loadout instead.
Android Version Versus the Windows PC Version
Touch controls handle this game well, since dragging a hero and tapping a build spot needs no precision aiming. The Android build also runs offline with no connection required, which the store listing treats as a headline feature. Google Play lists a 4.7 rating from roughly 106,000 reviews and more than one million downloads.
The Windows PC build changes the money side rather than the gameplay. On PC, the towers and heroes that mobile players buy separately come bundled in, so nothing sits locked behind extra purchases. Android players instead get a free install with optional purchases, plus inclusion in Google Play Pass.
Tower Placement, Gold Bounty and Wave Timing Controls
Tower placement happens only on marked build spots along the enemy path, and each spot holds one tower for the whole stage. Gold arrives as bounty from kills, so your income depends on how fast your defenses clear each wave.
Tapping an empty spot opens a build wheel showing your five chosen towers with their prices. Tapping a built tower opens its upgrade panel. Selling refunds part of the cost, which matters when a stage turns against your first plan.
Two off-path tools sit at the bottom of the screen. Call Reinforcements drops temporary soldiers anywhere on the map. Soul Impact hits a chosen zone from above. Both run on cooldowns rather than gold, so free damage sits there every fight.
Building and Upgrading Towers on Fixed Build Spots
Corners and long straights carry the most value, because enemies spend the longest time inside tower range there. Barracks towers work differently, since their soldiers walk to a rally point and block the path. Placing a barracks slightly ahead of your damage towers creates a holding pocket.
Upgrading beats spreading in almost every case. A tier 3 tower usually out-damages two tier 1 towers of the same type for similar gold. Therefore, most stages go smoother when you commit to two strong positions early rather than dotting cheap towers around the map.
Gold Bounty and the Early Wave Summon Bonus
Every enemy pays gold bounty on death, and the counter at the top of the screen tracks your purse. A wave summon button appears between waves, and calling the next wave early pays extra gold. That bonus shrinks as the timer runs down, so early taps pay best.
This is the fastest legitimate income boost in the whole campaign. Summoning early during waves one through four typically funds your third tower before the first armored group arrives. However, stacking two waves on a thin defense punishes you quickly, so only pull waves forward while your kill zone still clears enemies comfortably.
Call Reinforcements and Soul Impact Between Waves
Call Reinforcements places a pair of soldiers wherever you tap, and they hold ground for a short time before fading. Good commanders drop them on an unguarded path rather than into an existing fight. Similarly, dropping them in front of a fast runner buys the seconds your towers need.
Soul Impact strikes a targeted zone and works best on packed groups. Save it for the moment a wave bunches at a barracks wall instead of firing it at the first enemy you see. Both tools recharge for free, so leaving them unused all fight throws away damage you already own.
How to Unlock Towers and Pick Your Five Tower Slots
The loadout screen in this tower defense campaign holds exactly five slots, drawn from a pool of 22 towers. You set that loadout before a stage begins, and it locks for the whole fight, so the five towers you pick decide which damage types you can bring at all.
Roughly 11 towers come free on Android, and the rest sit behind in-app purchases. New towers appear as you push deeper into the realms. Each one arrives with its own upgrade tree of 11 upgrades.
Four roles cover the tower list: archer, barracks, mage and artillery. A few towers blur those lines, and Deep Devil’s Reef acts as both a barracks and a mage tower. Picking five towers that all share one damage type is the most common early error in this campaign.
Free Towers Versus Paid Towers on Android
Your free pool includes Shadow Archers, Bone Flingers, Goblirangs, Orc Warriors Den, Dark Knights, Elite Harassers, Infernal Mage, Specters Mausoleum, Orc Shaman, Melting Furnace and Rocket Riders. That set alone covers all four roles comfortably. So a full campaign clear needs no purchase at all.
Paid towers such as Wicked Sisters, Rotten Forest, Deep Devil’s Reef, Blazing Gem, Grim Cemetery, Swamp Thing, Ignis Altar, Shaolin Temple and Goblin War Zeppelin add flavour rather than raw necessity. Most of them fill niche jobs like heavy stalling or anti-air burst. Buy one only after a specific stage exposes a gap you keep hitting.
Covering Four Tower Roles With Five Slots
A balanced first loadout runs one barracks, one archer, one mage, one artillery and one flexible fifth pick. Barracks towers stop ground units and buy time. Mage towers handle armored enemies, since armor blocks physical hits far more than magic ones.
Artillery towers cover packed groups but struggle against single fast targets. Because the mix shifts by realm, the fifth slot works best as a swap slot rather than a favourite. Dwarven stages want more magic damage, while zombie-heavy stages want stronger area coverage.
Bone Flingers, Elite Harassers and Other Cheap Picks
Bone Flingers throw bones at random targets in range and cost noticeably less to level than most towers, at roughly 180 gold from tier 3 to tier 4 while others sit near 220 or higher. Random targeting sounds like a drawback. In practice it lets them hit support enemies hiding behind the front rank.
Elite Harassers rank near the top of most community lists because their soldiers survive far longer than standard barracks troops. Pairing them with Specters Mausoleum creates a wall plus magic damage combination that carries most early realms. Melting Furnace then covers the packed waves that slip past both.
How to Unlock Heroes and Level Them to Ten
Heroes unlock through campaign progress or through separate purchases, and one hero joins each battle as a single unit you drag across the map. Asra the Shadow Assassin comes free at stage five, Clockwork Factory, and she starts at level 3 instead of level 1.
Heroes gain experience from kills during stages and cap at level 10. Each level grants hero points, which you spend on that hero’s abilities in the hero screen.
The store lists 17 heroes and 30 hero upgrades in total. Vez’nan himself plays as a teleporting caster with Magic Shackles and Arcane Nova. Meanwhile, heavier picks like Jigou soak damage in the middle of a crowd, and gems fund the items your hero carries into battle.
Asra and the Free Heroes You Start With
Asra moves faster than any other hero in the roster, which lets her cover two paths on wide stages. Her poison strike deals true damage over time, so armored targets take full punishment from it. Her health pool stays low though, and careless placement gets her killed.
Death is not permanent during a fight. A downed hero respawns after a timer, and Asra’s timer runs short at around sixteen seconds. Because of that short wait, aggressive play with her costs less than it would with a bulkier hero.
Hero Points, Abilities and the Level 10 Cap
Hero points arrive with each level, and every hero has one pair of exclusive upgrades that forces a real choice. Spreading points thinly across every ability produces a weak hero at level 10. Instead, push one damage ability and one control ability to their top ranks first.
Level 10 arrives faster than most players expect, which is a common complaint in store reviews. Once a hero maxes out, further experience does nothing, so swapping to a second hero on the next stage starts building a backup. Two levelled heroes give you an answer for both ground swarms and single armored targets.
Trinkets, Artifacts and Your Three Item Slots
Items in this campaign are one-use tools bought with gems, and the store lists over ten trinkets and artifacts. You may equip only three at a time, so the choice matters before a hard stage rather than during it. Common picks include a thrown bomb for area damage and an ice bomb that freezes a group for several seconds.
Gems arrive steadily without spending money. Enemies drop small amounts, finished stages pay a lump sum, achievements pay more, and a rewarded video hands over 50 gems. Saving gems for an Impossible difficulty attempt beats spending them on stages you already clear.
How Upgrade Points and the Four Upgrade Trees Work
Upgrade points are the permanent progression currency, and campaign stages award them for completion. Four trees spend those points: towers, heroes, Call Reinforcements and Soul Impact.
Tower and hero trees hold 11 upgrades each, while the two spell trees hold 8. Several nodes come in exclusive pairs, meaning one choice locks the other out for that save.
This is the layer most new commanders underuse. Tower abilities stay unavailable in battle until their tree node opens, so an unspent point pool directly weakens every stage you attempt. Multiple save slots exist, which lets curious players test a second build order without wrecking their main run.
Why Star Ratings Do Not Change Your Upgrade Points
Stage stars track how many lives you kept, and three stars means a clean run. Many articles imply that three-starring gates your progress. That is not how this entry works, because the number of upgrade points a campaign stage pays stays the same no matter how many lives you lose.
Replaying an already-cleared stage for a better star count therefore pays no extra points. Chase stars for achievements and personal pride instead. If your goal is a stronger tree, pushing forward into new campaign stages is the only route that actually adds points.
The Call Reinforcements Split: Melee or Ranged
The Call Reinforcements tree splits into two exclusive branches. One branch turns your soldiers into tougher melee fighters. The other arms them with ranged weapons that can also hit flying enemies.
Melee suits players who use reinforcements as an emergency wall in front of leaking paths. Ranged suits players who already run strong barracks towers and want extra chip damage. Neither branch is wrong, although the ranged option answers air waves that would otherwise need a dedicated tower slot.
Feeding Soul Impact Before It Falls Behind
Soul Impact is the free area strike attached to Vez’nan’s power, and its tree runs eight upgrades. Early ranks cut the cooldown and raise damage, which turns it from an occasional trick into a reliable wave clear. Players who leave this tree empty until late realms feel the gap during boss waves.
Two or three points here pay off immediately on stages with a single choke point. For example, a strike timed on a bunched group at a barracks wall can erase an entire rank of goblins. Skipping it entirely means paying gold for damage you could have had for free.
All 9 Realms, 42 Stages and 6 Boss Fights
Nine realms hold 42 stages in total, and six boss fights punctuate that march across Linirea. Realms change the enemy roster rather than just the scenery, and the store counts more than 60 enemy types across the campaign.
The main storyline runs 16 stages. Side campaigns supply the rest, including the pirate content that many long-time players rate as the strongest addition.
Four difficulty settings apply to every level: Casual, Normal, Veteran and Impossible. Impossible exists for fully upgraded accounts with a level 10 hero, so attempting it early wastes time. Achievements number over 60, and hidden secrets sit tucked into stage art for players who tap around.
The 16-Stage Main Campaign and the Side Campaigns
Only the opening stages unlock at the start, and each finished stage opens the next node on the realm map. Vez’nan’s Tower serves as the tutorial fight, and Dwarven Gate follows as the first real test. Kazan Mines then introduces the armored dwarven units that punish physical-only loadouts.
Side campaign stages unlock after specific story progress rather than by paying points. They run harder than main stages of the same position, since the game assumes a developed tree by then. Treat them as optional difficulty rather than required progression.
Boss Fights and the Damage Types That Break Them
Six bosses close out major arcs, and each one absorbs enormous damage while shrugging off crowd control. Single-target damage matters more than area damage during these fights. Therefore, a loadout stuffed with artillery towers struggles badly at the finish line.
Bosses also spawn escorts that flow past while your towers focus the big target. Building a barracks wall behind your damage cluster catches those leaks. Save Soul Impact and any equipped item for the moment the boss reaches your strongest tower group, since that overlap is where boss health drops fastest.
Heroic Challenge and Iron Challenge Payouts
Both challenge types unlock as soon as you finish a stage in the campaign, with no star requirement attached. Heroic Challenge gives you one life against six large waves. Iron Challenge changes the rules of the fight instead.
Here is the part almost nobody states plainly. In this entry, neither challenge pays upgrade points, unlike the first three games where challenges fed the upgrade tree. Finished challenges pay gems and achievements only. So they are pure skill tests, and skipping them costs you no progression at all.
Common Mistakes That Leak Lives in Late Waves
Late-wave life leaks almost always come from thin coverage near the exit rather than from weak towers. Enemies that survive your main kill zone meet nothing on the final stretch, and each escape costs a life directly.
Three habits cause most failed runs. Spreading gold across too many low tier towers is the first. Bringing one damage type into a mixed enemy wave is the second.
The third is treating gems as a savings account. Items cost gems, gems refill from kills and achievements, and an unused item does nothing for your run. Boss waves and Veteran attempts are exactly where that stored currency should go.
Thin Coverage Near the Map Exit
Most players build forward, near the spawn, because early kills feel satisfying. Enemy paths often branch though, and one branch usually reaches the exit with far less resistance. A single barracks tower placed on that quiet branch prevents more life loss than another archer tower up front.
Check the path preview before wave one and count how many build spots sit in the final third of the route. If the answer is one or two, claim them early. Otherwise gold shortages later will force you to leave that stretch bare.
Ignoring Armored, Flying and Magic-Resistant Enemies
Armor cuts physical damage heavily, which is why dwarven stages break archer-only loadouts. Magic-resistant enemies do the reverse and punish mage-heavy setups. The campaign rotates these two types deliberately, so a fixed loadout eventually meets a wall.
Flying units skip your barracks entirely and float straight over your soldiers. Because of that, at least one tower with reliable air coverage belongs in every loadout past the early realms. Ranged reinforcements can patch the gap in a pinch, although a proper tower answers it far better.
Hoarding Gems Instead of Spending Them on Boss Waves
Gems accumulate quietly through normal play, and many players finish the campaign having spent none. That habit turns a hard boss fight into a coin flip. One freeze item at the right second holds an entire escort group while your towers finish the boss.
Remember the three item limit before a difficult stage. Equip one damage item, one control item and one situational pick, then actually fire them. Items refill through play, so a spent gem costs you nothing you cannot earn back.
Best Kingdom Rush Vengeance Tips and Tricks for Beginners
Fast improvement in this dark army campaign comes from gold timing far more than from tower count. Wave summon bonuses, sell refunds and upgrade order decide your income curve, and income decides how strong your defense stands at wave ten.
Each of the three habits below builds on the systems that this game leans on hardest: the five-slot cap, the four upgrade trees and the wave summon button.
None of these tips need a purchase. All of them work with the free tower roster and Asra alone.
Loadout Tips Built Around the Five-Slot Limit
Set your loadout after reading the enemy preview, not before. One barracks, one archer, one mage and one artillery pick covers the basics, leaving the fifth slot for whatever the stage threatens most. Swapping that fifth slot between attempts costs nothing.
Keep one cheap tower in every loadout for board control. Bone Flingers fill that job well, since their low upgrade costs let you level them while saving for something expensive. As a result, you get usable damage during the awkward middle waves when gold runs thin.
Upgrade Point Tips Across the Four Trees
Spend your first points unlocking tower abilities rather than raising flat stats, because a locked ability cannot be bought in battle at any price. Two or three towers with their abilities open beat six towers with none. Pick the towers you actually field and finish their nodes first.
Add Soul Impact ranks next, then a few hero nodes. Leave the Call Reinforcements branch choice until you know your own habits, since melee and ranged lock each other out. Players who never move their reinforcements should take the ranged branch for the air coverage.
Wave Summon Tips That Fund Your Third Tower
Summon waves one through four the instant your opening tower can clear them. That bonus gold usually buys a third tower before armored units show up, and an extra tower at wave five compounds across the whole stage. Watch the bonus counter fall as the timer runs, since late taps pay far less.
Stop pulling waves forward the moment your kill zone starts leaking. Two overlapping waves against a half-built defense ends runs quickly. For safety, summon early during the opening third of a stage and let the timer run naturally after that.
Frequently Asked Questions About Kingdom Rush Vengeance
Is Kingdom Rush Vengeance free to play?
Kingdom Rush Vengeance installs free on Android and carries optional in-app purchases plus ads, and it also appears in the Google Play Pass catalogue. Google Play rates it 7+ for mild violence. The game runs fully offline once installed, so no connection is needed during play.
How long does the campaign take to finish?
A first run on Normal difficulty lands around 8 to 12 hours for most players, at roughly 8 to 12 minutes per stage. That short stage length makes it a strong commute game. Veteran and Impossible reruns easily double that figure for completionists chasing every achievement.
Do you need to buy towers and heroes to win?
No purchase is required to finish the campaign, since the free roster covers all four tower roles. Paid towers can also be tested at no cost inside Heroic and Iron Challenges, which is the cheapest way to judge whether one suits your play before buying it.
Who Should Command the Dark Army
This campaign suits players who enjoy tight, hand-placed defenses and short sessions rather than idle collecting. Newcomers get a fair run with the free towers and Asra, while series veterans get real teeth from Veteran and Impossible reruns. I spent my own first campaign forcing Bone Flingers and Elite Harassers into every stage. The game punished that stubbornness at the dwarven stages until I rebuilt my loadout around magic damage. Buy nothing at first, finish the main storyline, then decide whether one paid tower fills a genuine gap. As villain-side tower defense on Android goes, this one still sets the standard.
Images



Download links
ℹ️ Download link not working? Please refresh the page and try again.
Developer's apps








New Apps
Most Played Mobile Games


