
20 Minutes Till Dawn: Premium MOD APK (Unlimited Money, Ticket)

Description
20 Minutes Till Dawn Premium hides its monsters in the dark until their glowing eyes reach your flashlight. New players who keep dying around minute eight will find the spending order that fixes it here. Rune ranks pay back faster than fresh characters, and that single choice shapes your first ten attempts.
How to Play 20 Minutes Till Dawn Premium
20 Minutes Till Dawn Premium asks you to survive twenty minutes against nonstop monster waves using one character, one gun, and stacked upgrades. You move, aim, and reload yourself, then spend the currency each run pays out on permanent unlocks before your next attempt.
The setup borrows heavily from Vampire Survivors. However, the aiming belongs to you, and that one difference changes how the whole survival roguelite feels on a phone.
Bosses arrive on a timer rather than at random. Erabit Studios publishes this paid build without ads, so nothing interrupts a fight. Roughly 22.6K Play Store reviews sit at a 4.9 average, which is unusually high for a paid mobile title.
What a Standard Run Looks Like Minute by Minute
Small enemies trickle in for the first ninety seconds, and gems drop fast enough to push you to level three or four. Your first two upgrade picks decide the shape of everything after. Then the first boss spawns and drops a treasure chest.
Minutes five through twelve are the real test. Waves overlap, elite spawns mix into the crowd, and your damage either keeps pace or it does not. Most new players die somewhere in this window. By minute fifteen, a working build clears screens instantly, so the last stretch usually feels calmer than the middle.
The Lovecraftian Setting and Creatures of the Night
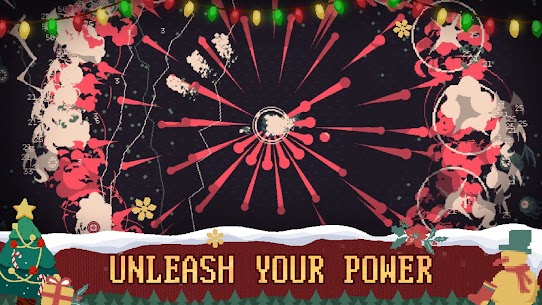
The horde draws on Lovecraftian mythology. Tentacled horrors, floating eyes, and cloning bosses all fit that theme, and the complementary color scheme keeps them readable against the black field. Vision stays limited on purpose.
Because your flashlight only lights a cone ahead, enemies register first as pairs of glowing eyes. This creates real tension at higher difficulty tiers. For example, a boss can close half the screen while you are facing the wrong way, which is why constant repositioning matters more than raw damage.
How It Compares to Vampire Survivors and Brotato
Vampire Survivors fires for you. Brotato locks you into a wave structure with a shop between rounds. Here, you hold the fire pad and manage ammo yourself, so a bad reload window costs a life bar rather than nothing.
Halls of Torment and PlatyGuard: Swarm Slayer sit in the same Play Store cluster and lean closer to auto-attacking. Therefore the choice comes down to how active you want your hands to be. Players who found Vampire Survivors too passive tend to stick with this one, while players who want a podcast game usually do not.
Android Version vs the PC and Switch Version
Touch controls use a movement pad on the left and an aim pad on the right, with auto-aim available and automatic reload triggering when you lift your thumb. Keyboard and mouse on PC give sharper aim, though the phone build compensates with generous aim assist.
Content parity is the sticking point. The mobile paid build trails the PC release, and it also trails the ad-supported mobile release, which is the single most repeated complaint in recent reviews. Switch owners get controller support and a similar feature set. So if you want the fullest roster, the desktop version still leads.
Gameplay Mechanics and Twin Stick Controls
Movement and aiming run on two separate touch pads, and the gun fires continuously while your right thumb stays down. Ammo is finite per magazine, so reloading is a real decision instead of a formality.
Every kill drops gems. Those gems fill an XP bar, and each level pauses the action to offer four random upgrades. That pause is your only breathing room in a busy wave.
Boss chests and pentagram pickups sit on top of that loop. In practice, the whole run comes down to how quickly you convert gems into a working build before minute five.
Aiming, Firing, and Reloading in the Dark
Auto-aim locks onto the nearest target, which suits crowds. Manual aim, by contrast, lets you focus a boss while trash swarms around you. Most experienced players switch between both depending on the wave.
Reloading happens automatically when you release the fire pad or empty the magazine. That sounds convenient. Nevertheless it punishes players who hold fire constantly, because you end up reloading right as an elite closes in. Tapping the pad in short bursts keeps a partial magazine ready for emergencies.
Gems, XP, and Picking One of Four Upgrades
Gems serve double duty as experience and as a pull toward danger, since they sit where enemies died. Collecting them means walking back into a crowd you just cleared. Greedy pickups end more runs than boss damage does.
The upgrade pool is deep. Over 80 different upgrades exist, so no two attempts offer the same four choices at level five. Picking narrowly matters more than picking strongly. A focused elemental line beats four unrelated stat bumps almost every time.
Boss Chests and Pentagram Pickups
Defeated bosses drop treasure chests containing special rewards, and those chests are the only source of Tomes. Grabbing one is safe because the field clears briefly after a boss dies.
Pentagrams appear as field pickups and clear or damage nearby enemies. Save them. For example, holding a pentagram until the second boss overlaps with a heavy wave turns a likely death into a free thirty seconds. New players tend to trigger these immediately, which wastes the strongest emergency button in the game.
How to Unlock Characters with Souls
Souls are the single currency in this game, and every attempt pays them out whether you survive or die. The payout formula adds your seconds alive, your kill count, and 100 multiplied by the level you reached.
That formula rewards leveling far more than surviving. A short attempt that reaches level twelve often pays better than a cautious attempt that reaches level six.
The store listing states there are over 10 distinct characters, and the roster has grown through seasonal updates. Weapons share the same currency pool, so every purchase competes with every other purchase.
How Every Run Pays Out Currency
Because level counts for 100 each, aggressive play pays. Killing fast raises your level, and a higher level multiplies the payout, so playing safe in a corner is the worst way to farm.
Quickplay attempts pay less overall because the clock stops at ten minutes. Still, they finish faster in real time, which makes them efficient when you only want another few hundred toward a rune rank. Endless attempts can pay enormously, though they demand a build strong enough to survive scaling bosses.
Shana, Diamond, Scarlett, and the Wider Roster
Shana starts unlocked and stays the most flexible pick, since she supports almost any build. Diamond brings high HP and defensive scaling, which suits players who keep getting cornered. Scarlett burns enemies with a fire wave that deals damage per second.
Hina, Spark, Lilith, Abby, and Yuki fill out the rest with elemental, summoning, and fire-rate identities. Lilith leans on summons, so her damage keeps working while you run. Each one changes which upgrade lines you should chase, not just your stat sheet.
Which Character to Buy First
Diamond is the sensible first purchase for anyone dying before minute ten, because extra health forgives positioning errors that no upgrade can fix. Scarlett is the better second buy once your movement improves, since burn damage scales into the late game.
Hold your balance until you can afford one full purchase rather than spreading it thin. Partial spending across three systems leaves you weaker in all of them. Additionally, character costs climb, so a single focused target reaches the finish line faster than three scattered ones.
How Sword Runes and Shield Runes Work
Runes are permanent account-wide upgrades bought from the loadout menu, and they apply to every character you play. Two families exist, Sword and Shield, and each family holds four rank rows labelled 1+, 5+, 10+, and 15+.
Here is the detail most write-ups skip. The next row opens once you buy any five ranks across the current row, in any combination, not five ranks of a single rune.
Ranks cost Souls, and once bought they are permanent and non-refundable. You equip one rune per row per family, giving 8 active at a time out of 24 unlockable. This is the strongest early investment in the entire progression system.
The Four Rune Tiers and Rank Requirements
Row two opens at five total ranks purchased, row three at ten, and row four at fifteen. Spreading five ranks across Power, Alacrity, and Mysticism reaches the same threshold as dumping five into one. Therefore breadth costs nothing extra early on.
Deactivating an equipped rune is free, so experimenting carries no penalty after purchase. What you cannot do is refund a rank. Consequently, players who buy into a rune they never equip lose that currency permanently, which is the most common early waste.
Sword Runes for Damage and Status Effects
Sword Runes raise damage output directly or indirectly. Some increase firing rate, others cut reload time, and several raise the chance of elemental procs landing on hit.
A few demand a specific playstyle before they pay off. For example, runes that reward high kill counts do nothing during a cautious opening. Match your Sword picks to the weapon you actually use most, because a reload-speed rune on a slow-firing crossbow build wastes an entire row slot.
Shield Runes for Staying Alive
Shield Runes keep you breathing. Healing grants extra hearts at kill milestones, Growth adds health at level milestones, and other options hand you a regenerating shield or extra knockback.
Movement speed hides inside this family too, and it is quietly the strongest defensive stat in the game. Bosses in the current version force constant repositioning, so speed converts directly into survival time. Most players undervalue it until their first serious attempt at a higher difficulty tier collapses at minute fourteen.
How Upgrades and Synergies Build Each Run
Every level-up pauses the fight and offers four random upgrades drawn from a pool of over 80 entries. Named combinations of those upgrades form synergies, which grant a bonus effect far stronger than either component alone.
The synergy screen opens mid battle from the pause button. Checking it early tells you which two-piece combinations are already half complete.
Tomes sit above all of this as run-defining rewards from boss chests. They hit hard and they always cost you something in return.
Reading the Synergy Screen Mid Fight
Opening the panel takes one tap and costs no time, since the action freezes. Scan it after your third level, not your tenth. By then you have enough picks on the board to see which lines are worth chasing.
The panel lists each combination and its required components. Because upgrades appear randomly, planning a synergy you have zero pieces toward usually fails. Instead, treat the screen as a filter that tells you which of the four offered choices completes something you already own.
Mini Clip, Fan Fire, and Fresh Clip
Mini Clip requires both Fan Fire and Fresh Clip. Once complete, it decreases reload time and increases damage, which means fewer moments standing still while a wave closes in.
That combination suits any weapon with a small magazine. Dual SMGs benefit most, since their reload frequency is punishing without it. Similarly, players running a crossbow gain less, because long reloads matter less when each shot pierces a line of enemies. Pick your synergy target around the gun you chose at the start screen.
Tomes and Their Built In Drawbacks
Tomes only spawn from boss treasure chests, and each one carries a tremendous boost paired with a debuff. Taking one is a genuine gamble rather than a free reward.
Read the drawback before accepting. A damage Tome that cuts your health pool works fine on Diamond and ruins a fragile character. In my attempts, refusing a Tome has saved more runs than accepting one has won, especially past minute twelve when a health penalty leaves no margin for a single mistake.
All Game Modes and the 15 Darkness Levels
Three modes exist: Standard Mode at twenty minutes, Quickplay Mode at ten minutes, and Endless Mode with no timer at all. Only one of them advances your account.
Standard Mode holds every achievement and every difficulty unlock, so it is the mode that matters for progression. The other two exist for pace and for showing off.
Layered on top sits the difficulty ladder, running from 0 up to 15. Each step stacks the previous penalties rather than replacing them, and a full Standard session plus menu time runs roughly twenty two to twenty five minutes end to end.
Standard Mode and Achievement Unlocks
Runes stay enabled in Standard Mode, which makes it the fairest test of your account progress. Achievements unlock here and nowhere else, so completionists have no alternative route.
Clearing a session also stamps your character and weapon with the highest difficulty tier you finished using them. That marker turns the roster screen into a checklist. Many long-term players work through every character at the top tier purely to turn those icons red.
Quickplay Mode for Ten Minute Sessions
Quickplay trims the clock to ten minutes and uses the same enemy schedule as the opening half of a full session. Nothing new spawns. It simply ends before the hardest waves arrive.
Achievements and difficulty unlocks stay locked out here. For that reason, treat it as a testing ground rather than progression. It is genuinely useful for trying a new weapon without committing twenty minutes to finding out the pairing does not work.
Endless Mode and Runaway Boss Scaling
Endless Mode removes the timer entirely, and enemy health keeps climbing with no ceiling. Bosses eventually spawn with resistances stacked on top of that scaling.
The failure point is predictable. Past a certain depth, a new boss appears before you finish killing the previous one, and the field never clears. Runes stay active, so a strong account reaches deeper. Players chasing large currency payouts still find this the fastest route once their build can handle the third boss.
How Each Darkness Level Raises the Stakes
Each tier applies a specific modifier and keeps every earlier modifier active. At tier two, for example, small enemies spawn 25 percent more often and carry 25 percent more health, on top of tier one’s penalty.
Clearing one tier opens the next, all the way to 15, and certain achievements require finishing at 15 specifically. Progress here is slow by design. Move up one step at a time, because jumping several tiers after a comfortable win almost always ends in a minute-eight death.
Common Mistakes That End Runs Early
Most failed attempts in this survival roguelite trace back to spending decisions made in the menu, not to reflexes during the fight. Three errors repeat constantly among new players.
Overspending on the roster, ignoring movement speed, and playing with the default visibility settings all cost more than any single upgrade pick.
None of these require better aim to fix. Each one takes a single menu change, and together they usually add four or five minutes of survival time.
Spending on Characters Before Rune Ranks
A new character changes one run. A rune rank changes every run afterward, permanently, across the whole roster. That difference is enormous over a first week of play.
Because rank purchases stack toward opening the next row, early spending compounds. Buying Diamond first feels satisfying and delays that compounding by several sessions. Spend your first few thousand on ranks, then buy a character once the second row is open.
Skipping Movement Speed Against Bosses
Boss design in the current version pushes you to keep moving, and several attacks simply cannot be dodged at base speed. Players who invest only in damage hit a hard wall around the second boss.
The complaint appears often in reviews, and it is fair. Movement feels like a wasted pick when a damage upgrade sits next to it. Nevertheless, one speed investment early converts into far more damage overall, because a dead player deals none. Take it in the first three picks.
Playing Without the Outline Visibility Option
An optional Outline setting adds a visible edge to enemies, and it exists precisely because the dark color scheme hides threats. Turning it on costs nothing and removes a large share of surprise deaths.
Screen size makes this worse on phones than on desktop. Small sprites against a black field blur together during heavy waves, especially with gems scattered underfoot. Switching the setting on before your first serious attempt is the single easiest improvement available.
Best 20 Minutes Till Dawn Premium Tips for Beginners
Weapon and upgrade pairings decide more of your outcome than character choice does, particularly in your first twenty attempts. Two pairings stand out as reliable starting points, and one farming routine builds the balance to support them.
Quick Hands with the Flame Cannon covers close-range crowds. Holy Shield with the crossbow covers distance and gives you reload cover.
Both pairings appear in the store description for a reason. They are the intended on-ramps, and they hold up well past the halfway mark of a session.
Pairing Quick Hands With the Flame Cannon
Quick Hands raises fire rate, and the Flame Cannon already deals heavy area damage. Combined, the two produce dangerous damage output against packed groups, which is exactly what minutes six through twelve throw at you.
The pairing has a weakness worth knowing. Burst damage at range stays poor, so a distant boss can chip you down while you clear trash. Pick up any projectile-speed or piercing upgrade offered alongside it. That single addition fixes most of the gap without changing your build direction.
Holy Shield and the Crossbow at Long Range
Holy Shield absorbs a hit and then regenerates, and the crossbow devastates enemies at long range with piercing shots. Together they let you fight from a distance while the shield covers your reload windows.
Regeneration timing is the real value here. Because the shield comes back on its own, retreating for a few seconds restores your buffer instead of costing you health permanently. Scarlett pairs oddly with this setup, since her fire wave wants closer range. Shana or Abby fit it better.
Farming the First Ten Minutes on Low Difficulty
Currency payout rewards kills and levels, not caution, so farming works best at a low difficulty tier where you can push aggressively without dying. Run the lowest setting, play greedy, and accept an early death at level fifteen over a slow survival at level eight.
Repeat that four or five times before your next purchase. In my experience, a focused farming session of about ninety minutes covers a full rune row plus a character. Chasing higher tiers before your account can support them just slows the whole process down.
Frequently Asked Questions About 20 Minutes Till Dawn Premium
Is 20 Minutes Till Dawn Premium free?
No. The paid build carries a one-time price on Google Play and the App Store, though Google Play Pass members can install 20 Minutes Till Dawn Premium at no extra charge as part of that subscription. Buying it removes ads and in-app purchases permanently, with no season pass attached afterward.
Is the game hard for beginners?
Not at the lowest difficulty setting. The opening ten minutes give new players room to move, and most early deaths happen once the second boss overlaps with a heavy wave. Difficulty only climbs when you raise it yourself, so beginners can farm the bottom tier indefinitely without pressure.
Does the game still get new content?
Yes, though not on the same schedule as the ad-supported release. Seasonal events such as the Flame Festival do arrive here, while new characters land on the other version first. That release also carries a Twilight bonus, a level-based magnet effect, which never shipped to this build.
Who Should Buy the Premium Version
Buy this one if you want an active shooter rather than an auto-battler, and if ad interruptions genuinely bother you during a twenty minute session. Players who care most about having every character should install the ad-supported release instead, because it stays ahead on content. After a lot of attempts across both, I still prefer this build for the clean, uninterrupted run, even knowing it trails behind. The manual aiming is what makes it worth the money. At a 4.9 average from over 22,000 reviews, the audience clearly agrees.
Images



Download links
ℹ️ Download link not working? Please refresh the page and try again.
Developer's apps




Related apps




What's new
1. New Event: The Flame Festival is live from June 30 – July 14!
2. Game performance and stability optimized.
3. General bug fixes and improvements.
New Apps
Most Played Mobile Games


